Showing posts with label Main Dishes. Show all posts

Friday, January 23, 2015

{recipe} oven roasted fajita quinoa bowls

Sometimes you just really need some fajitas. Am I right, or am I right? You especially feel the need for fajitas in your body right this second when it is chilly and pouring and you're *stuck in the house because you  definitely don't feel like getting wet and cold even though you really need to run some errands*. Just me? 


I got the idea to make oven roasted fajitas on Pinterest (duh), and the cravings began. I decided to make a fajita bowl because I didn't have any corn tortillas, and there was that whole not wanting to get wet thing going on, so you know I was not about to run out to Publix or Trader Joes for that. I thought to myself, "I love burrito bowls! Why not make a fajita bowl?" And the quinoa fajita bowl with roasted corn and a jalapeno lime cilantro Greek yogurt crema was born. Ohhh I'm getting hungry again just thinking about it!

Click through for the recipe!

Wednesday, May 28, 2014

{recipe} vegetable and quinoa stuffed zucchini


Today has been quite the day. I tried to wake up a few hours before it was actually necessary for me to get up in order to get some stuff done, only to be lured back to sleep by extremely rare morning rain. Instead of having enough time to write a blog post and reply to emails before work, I had just enough time to shower and eat some leftover banana pancakes before scampering out the door. I went to work and enjoyed a game of Scattergories with my oldest students, until the moment I had to give a stern lecture as to why using a specific word that starts with N is not an acceptable answer for the category Things that are black. Iyiyi. I came home with grand plans to workout, but those fell through because... um. I'm lazy. I spent the rest of the day replying to emails, planning my trips to Switzerland and Greece (any advice friends?!), listening to some great Spotify playlists, and watching the crazy weather go from sunny one minute to raining the next. Needless to say, it wasn't terribly exciting, but I did have lots of time to think about the next few months and everything that is going to change when I move back home.

Wednesday, April 23, 2014

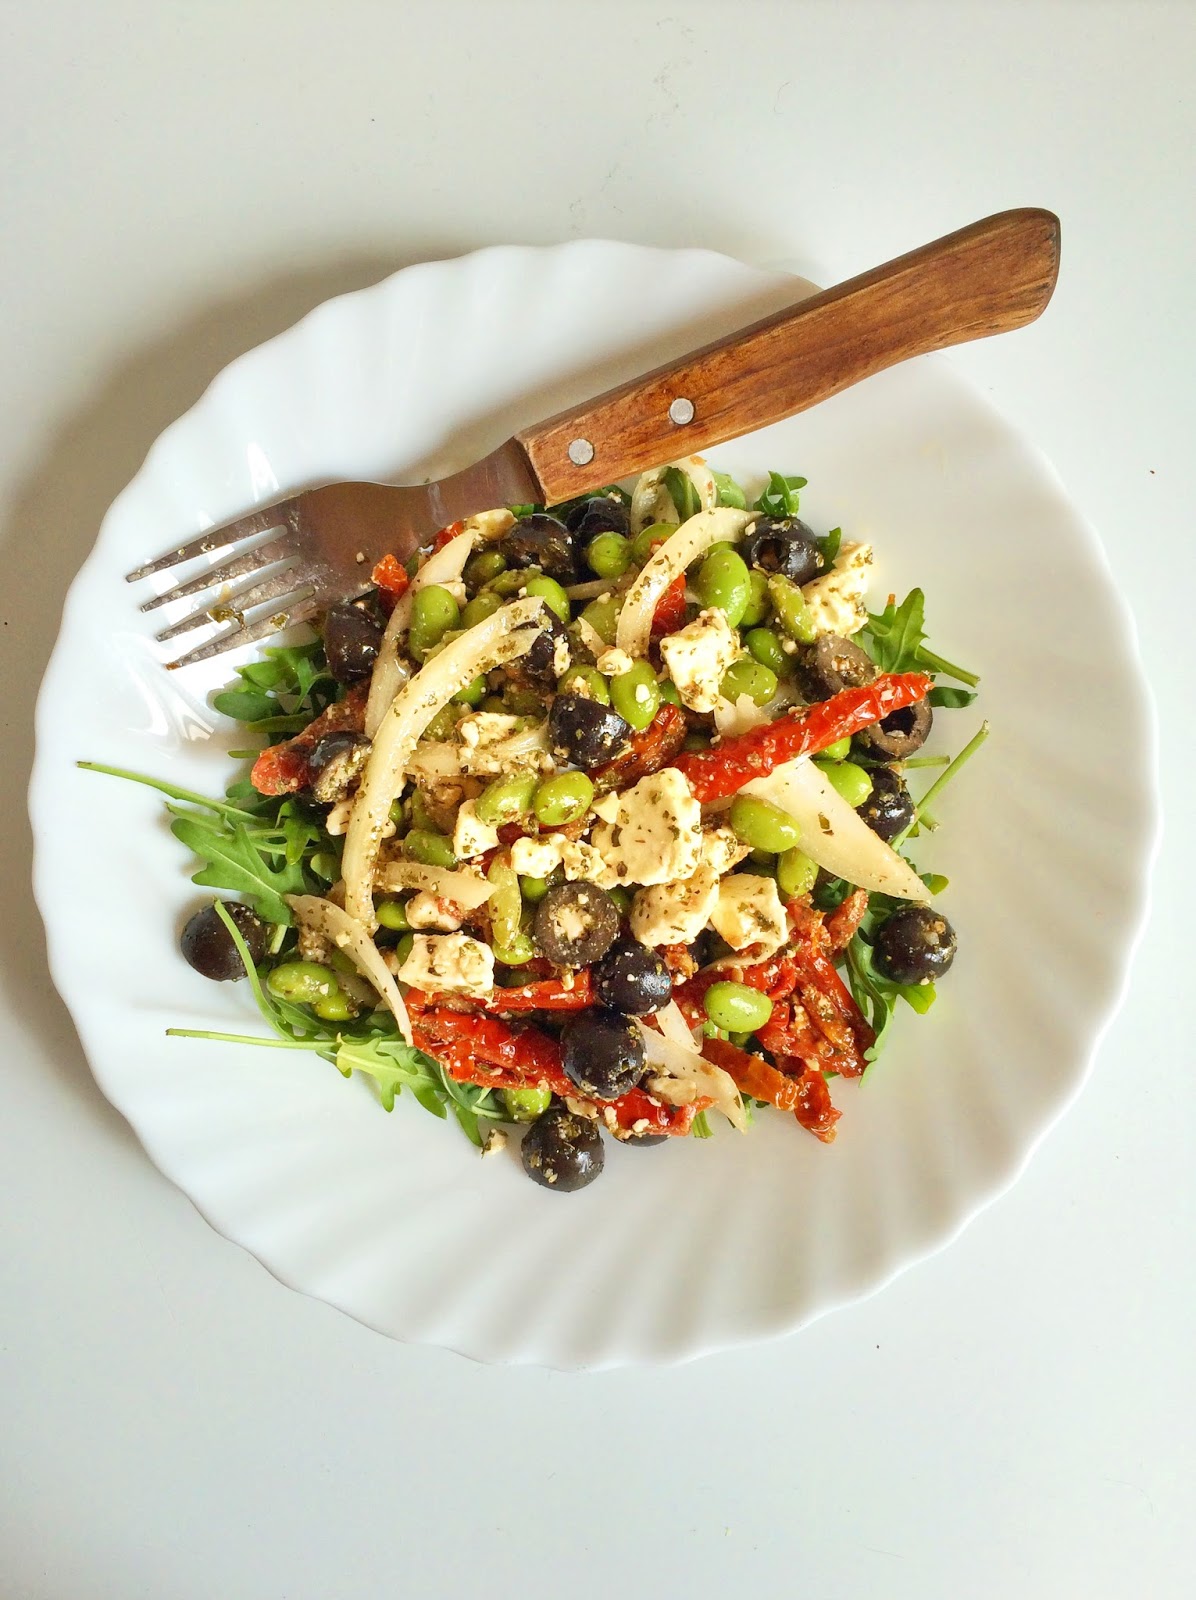
{recipe} mediterranean edamame salad

Dear friends, meet your next lunch. Hi, lunch!


I made this salad just before I left for carb, gelato, and cannoli heaven in Italy for my big kid version of spring break -- I love teaching! (Lots of Italy spam to come on the blog. Get exciiiited!) I had a bunch of random ingredients I wanted to use up before I left, and a huge block of feta cheese sitting in my refrigerator that my roommate brought back from Greece. She is so kind for sharing it, isn't she?! I know that edamame typically only goes in Asian dishes, but trust me on this one. They add a sweet little crunch to the salad, but even better -- lots of protein. Did you know that just 1/2 a cup of shelled edamame has 11 grams of protein in it? Solid.

This salad is extremely quick and easy to whip together and travels really well. We don't have a refrigerator at my school for teacher use, so I have to bring snacks to work that won't go bad. In my opinion, the flavors actually get better if you let the salad warm up to room temperature a bit. I threw it over some arugula I needed to use up, but you could also top a grilled chicken breast with it as well! That actually sounds super delicious now that I think of it.... 

Monday, October 7, 2013

{recipe} spiced lentil vegan burgers + weekend shenans

Hellllllo beautiful people. I'm back with another veggie burger. Surprise, surprise.


But first, weekend shenanigans!

I so wish that weekends never had to end... Especially weekends with absolutely perfect weather. In Madrid, we are currently in the paradise temperatures in between summer and fall. We're talking low 70s during the day and low 60s at night. Absolutely delightful. We decided to spend this weekend exploring our neighborhood a bit. Once my roommate and I find a place we reallllly love, we tend to go there... again, and again, and again. There are so many great restaurants and bars nearby that we just kind of skip on by every weekend. We decided to make up a little tapas crawl of our own based on blog recommendations written by Spaniards. Fun was had. :) Even if we had to eat anchovies.... yuck.


Poor little anchovy's spine.

On Saturday, my roommate and I went to the modern art museum, Museo Reina Sofia, with a new friend. We spent a few hours in there cracking up at all of the "art." Don't get me wrong, I appreciate a good artistic effort, but some of the pieces on display were so wacky. We also got to see some... interesting... performance art take place. Um. We were giggling uncontrollably. 

Onion... on a wine bottle. Typical Reina Sofia display. :)

It was such a wonderful weekend! Unfortunately on Sunday I woke up with a throbbing in my mouth. My wisdom tooth decided to break through and is now causing some issues. I'm terrified to go to the dentist here but it definitely has to happen. Accepting all positive thoughts for that situation... eek!

Okay, back to the yummmmmy burger. Since I was feeling a bit too under the weather to get out and enjoy the beautiful day yesterday, I decided to cook. I was going to make lentil soup, but then I discovered this recipe and that idea went right out the window. These burgers are super filling and delicious. I definitely recommend you smother them with some sriracha aioli. nommmmmm.


And just because you are really great and actually read this entire post, you get a bonus recipe for baked steak fries! Woooo, go you! PS. Don't freak out if you don't have all of the right spices for this recipe, I adapted the spices from the original recipe to use what I had in my kitchen. Play around with your spices!

Spiced Lentil Vegan Burgers
recipe adapted from Food.com
Makes 6 regular sized burgers

Ingredients:
  • 1 cup dry lentils
  • 1 small onion, diced
  • 2 carrots, grated
  • 1/2 cup flour
  • splash of water
  • 1 pinch salt
  • 1 teaspoon cumin
  • 1/4 teaspoon paprika
  • 1 teaspoon Mrs. Dash seasoning (or favorite seasoning)
  • 1 pinch black pepper
  • 1-2 teaspoons olive oil
Directions:
  1. Before you chop everything up, start to cook the lentils. Gently boil them in enough water to cover them by 2 inches, with no salt. They will take about 30 minutes to cook. Make sure you can mash them up a bit before you take them off of the heat. I had to add a little bit more water during the process until they got to the right consistency.
  2. While lentils are cooking, dice the onion and grate the carrot into a big bowl.
  3. Drain the cooked lentils and pour them into the bowl with the onion and carrot. Mash them a bit, but not too much, and add enough flour to the point where the three ingredients will stick together. I added the flour 1/4 cup at a time, and mixed it thoroughly. Add a splash of water if the flour isn't getting it to the right consistency.
  4. Season the mix with the spices, salt, and pepper.
  5. With your hands, form the burgers. Add a teaspoon of olive oil to a heated pan, then add the burgers. Leave them on for about 10 minutes on one side, then flip to cook for 5-7 minutes more on the other side.
  6. Serve smothered with sriracha aioli (mayonnaise and sriracha mixed well), spinach, and tomatoes.

Baked Steak Fries:
One serving of fries

Ingredients:
  • One small potato, rinsed and scrubbed, and cut into wedges
  • Olive oil
  • Salt
  • Paprika
Directions:
  1. Preheat oven to 450*F
  2. Coat potato wedges with a bit of olive oil, salt, and paprika.
  3. Put in oven for about 35 minutes or until at the right crispiness.
  4. Serve with some mooooooore sriracha aioli... duh.

Bon appetite my lovely readers!

xx, Jen

Friday, August 23, 2013

{recipe} quinoa black bean veggie burgers

Say hello to your next dinner.


I made these a few weeks ago, but naturally have slacked like crazy on blogging the recipe. I know that these will 100% be put into my cycle of easy weeknight meals from now on. They are packed with protein and fiber, and low in sodium and fat. And they're pretty. Win, win situation people.

When I was eating this veggie burger, the word that kept popping up into my head was "substantial." Weird, but true! These burgers are nothing like your run-of-the-mill frozen who-knows-what-is-in-here patty from the grocery store. They are... substantial. And fill you up like crazy! So, when in doubt.... make your own veggie burger!


Quinoa Black Bean Burgers:
Recipe found on Inquiring Chef
Ingredients:
  • 1/2 cup dry quinoa
  • 1 tsp olive oil
  • 1/2 red onion, chopped
  • 3 cloves garlic, minced
  • 1/2 tsp kosher salt, divided
  • 1 (15-oz) can black beans, drained and rinsed
  • 2 Tbsp tomato paste
  • 1 large egg
  • 2/3 cup frozen corn
  • 1/2 cup cilantro, chopped
  • 1 1/2 tsp ground cumin
  • 1 tsp chili powder
  • 1/2 cup rolled oats
  • 1/4 cup oat flour (made by running 1/4 rolled oats in the food processor until flour texture)
Directions:
  1. Rinse quinoa thoroughly in a fine-mesh strainer until water runs clear to avoid a bitter flavor once cooked. Place rinsed quinoa in a small saucepan with 1 cup of water. Set saucepan over medium-high heat and bring to a boil. Reduce heat to low, cover the pan, and cook 10-15 minutes until the water is absorbed and quinoa is cooked. Remove from the heat and allow to cool.
  2. Meanwhile, heat the oil in a small pan over medium heat and add the onion and garlic. Add 1/3 teaspoon salt and saute the onions until they are softened, about 5-6 minutes. Place the mixture into a large bowl. Add black beans to the bowl and using a potato masher or fork, mash together until a pasty mixture forms. 
  3. Stir in the tomato paste, egg, corn, cilantro, cumin, chili powder, and remaining 1/4 tsp salt. Stir in the cooked quinoa, oats, and oat flour until well mixed. Form the mixture into 6 equal patties.
  4. Place the patties on a baking sheet covered with parchment paper and cover with plastic wrap. If you are planning on eating the burgers the night-of, stick the tray into the freezer for about 30-45 minutes. If you can wait, put them in the refrigerator for a few hours or over night. This step helps to hold the burgers together when cooking.
  5. When ready to eat, place the tray directly into a pre-heated 400*F oven. Cook 10-12 minutes until the patties are golden brown and crispy. Flip them over and cook for another 10-12 minutes.


These burgers are incredibly versatile. We ended up serving them with guacamole and sauteed onions, but I think they would be delicious with a sriracha-mayo sauce too. You could even switch out the cilantro for a different herb like parsley or basil and serve these puppies with some roasted garlic, goat cheese, and grilled onions. YUM. Also. They are great over a salad as well. Just saying.


ENJOY!
xx, Jen

Tuesday, March 19, 2013

{recipe} thai noodle soup

Remember  that time when I had all the time in the world to bake cookies for my roommates and put things in my crock pot all week long? Or even that time when I posted recipes on the blog in general....? Yeah. Sorry bout that ladies! I'm baaaaaaaack.... for now. :)

The weather in Madrid has been absolutely crazy the last few weeks. Sunny and warm one day, rainy and cold the next. This is not boding well for my immune system... (not to mention the fact that all of my friends are sicky children too!) I knew it was time to make a huge pot of super comforting, homemade soup. I wasn't feeling the prospect of having to go to the meat store to pick up some chicken for chicken noodle soup, so I decided to go a vegetarian route and make an Asian noodle soup.


This soup could not have been any easier to make. It only took me about 20 minutes, which is perfect on a cold, rainy night filled with extra work tasks and pages of Spanish homework. The first spoonful was instantly comforting - it reminded me of being at home with my parents again. :) 

PS. Don't be intimidated by the ingredients - I changed the recipe up quite a bit from the original. Use what you have and what you like! 

Thai Noodle Soup:
Adapted from Domestic Fits

Ingredients:
  • Splash of oil
  • 2 cloves garlic, minced
  • 1/2 teaspoon fresh ginger, grated
  • 1 package extra firm tofu, drained and diced
  • 4 cups vegetable broth
  • 6 oz rice noodles (XL kind)
  • 3 tablespoons low sodium soy sauce
  • a few squirts of sriracha, to desired spiciness! 
  • a spoonful of chili-garlic sauce, to desired spiciness!
  • 1 tablespoon mushroom sauce (can also use fish, teriyaki, or other dark sauce)
  • 1/4 cup green onions, sliced
  • 2 tablespoons pickled ginger, sliced

Directions:
  1. In a large pot, heat the oil on medium heat. Add the garlic and ginger and stir. Add the tofu, cook until lightly fried, about 3 minutes. 
  2. Add the broth, noodles, soy sauce, sriracha, chili-garlic sauce, and mushroom sauce. Cover pot with a lid and bring to a slight boil on medium-high. I let my broth cook out a little bit while the noodles softened. Add the light green section of the green onions, stir into soup.
  3. Serve topped with the rest of the green onions, sliced pickled ginger, and a few more squirts of sriracha. Enjoy!
xx, Jen

Thursday, November 1, 2012

{recipe} hearty spicy chili stew

Is there anything more relaxing than cooking a huge pot of chili with all of the windows open on a beautiful fall day? Um.. let's add listening to the Mumford & Sons Pandora station on the surround sound. Yup. That's what I'm talking about. 


For my family, yesterday was not only Halloween. It was also my parents' 30th wedding anniversary! They are truly even more in love today than they were 30 years ago at their wedding. They are precious. :)


We enjoyed our Halloween evening out on the patio with a bottle of Dutton Goldfield Zinfandel and this delicious chili stew. I'm calling it chili stew because it has all of the makings of a chili but we like to use stew meat around here. After dinner we went outside, sat on our driveway, drank a beer, and handed out candy to the kids in our neighborhood. Pretttty awesome Halloween if you ask me!


Hearty Spicy Chili Stew:

Ingredients:
  • 4 lb. beef, cut into 1/2-inch cubes. (my grocery store sells "beef for stew" already cut into chunks.)
  • 2 tablespoons olive oil
  • 1 bottle of beer (I used a Yuengling Black & Tan)
  • 10 oz. beef broth
  • 2 cups chopped onion
  • 3 cloves fresh garlic, minced
  • 4 jalapeno chilies, seeded & minced
  • 1/4-1/2 cup chili powder, to taste
  • 2 tablespoons cumin
  • 1 teaspoon crumbled dried oregano
  • 2 14.5 oz. cans of diced tomatoes
  • salt to taste
  • cayenne pepper to taste
  • 1 cup frozen corn

Directions:
  1. In a large pot over medium high heat, brown beef in olive oil, stirring constantly. Add beer & beef broth to cover meat. If necessary, add water or more broth to make enough liquid.
  2. Add chopped onion and simmer for 30 minutes. 
  3. Stir in remaining ingredients (except for corn) and lower heat. Cover and simmer for 3 hours or until meat is tender.
  4. Just before serving, stir in frozen corn until warmed through.
  5. Serve with a dollop of sour cream and a dash of tabasco. 


Make sure to stop by tomorrow for a dessert including pecans, bourbon, and pumpkin. :)

xo, Jen

Thursday, September 13, 2012

{recipe} toasted sesame quinoa with grilled chicken

You know what really stinks about graduating from college as a sorority member? 

Graduating from college and becoming an alumnae of your sorority means early mornings spent cramming in breakfast, coffee, makeup, hair, outfit, and packing a lunch. Ugh. Growing up is so cruel. Yes, I might have complained more than a few times about the lunch options for the week at the house in my time. Fried food? AGAIN?! Well, at least there was always salad.


Now that I actually have to pack a lunch to stay alive during the days (I REFUSE to pay for mediocre food at lunchtime), I have started to get creative. This means less sandwiches and crackers, and more nutritional options. Pasta and quinoa salads are a great way to switch up the lunch grind and add in a more balanced meal. 

This quinoa salad has delicious Asian flavor without the (cough-FAKE-cough) American Chinese food that is played off as authentic in most Tampa restaurants. And probably 1/4 of the sodium. Win-win for us all!


I adapted the original recipe a bit by adding grilled chicken instead of shredded chicken. You can make this a super quick meal by shredding some rotisserie chicken too! (click here for my chicken shredding tutorial)

Toasted Sesame Quinoa with Grilled Chicken
Recipe slightly adapted from How Sweet Eats

Ingredients:
  • 1 cup uncooked quinoa, rinsed
  • 3 garlic cloves, minced
  • 1/2 tablespoon sesame oil
  • 1/2 tablespoon olive oil
  • 2 cups low-sodium chicken stock
  • 2 grilled chicken breasts, cut into bite size pieces
  • 6 green onions, sliced
  • 2 tablespoons toasted sesame seeds
dressing
  • 3 tablespoons olive oil
  • 2 tablespoons toasted sesame oil
  • 2 teaspoons low-sodium soy sauce

Directions:
  1. Heat saucepan over and add 1/2 tablespoon of sesame and olive oil. Add in garlic and quinoa and stir to coat, then toast for 3-4 minutes, stirring occasionally. Add in chicken stock and increase heat to high, bringing quinoa to a boil. 
  2. Reduce to a simmer and cover, cooking for 15 minutes, or until water is absorbed and quinoa can be fluffed with a fork. Whisk together dressing ingredients and set aside.
  3. Add in chicken, green onions, dressing, and sesame seeds, tossing well to coat.


This can be eaten warm or cold. Make the night before and pack for your lunch! It is filling and delisssh.

xo, Jen

Monday, July 23, 2012

{recipe} buffalo chicken enchiladas


I originally made these puppies in Chicago when I went to visit Seth.
Whipped out the recipe again when one of my good friends from home came to visit!

{laura is in the adorable tiny little thing in the middle!}

We ate these enchiladas while anxiously waiting for the Bachelorette to air. HELLO! Poor Arie. 
I applaud Emily for getting her feelings out in the open before it came time for him to get down on one knee...
but still. That poor, poor man. He looked absolutely heart broken!

I still don't see Jef and Emily together at all?
But I'm happy that they are happy!
I am also happy that I have regained control of my Monday nights from 8-10 PM... ;)

What are your thoughts on the Bachelorette season finale?!
I was hoping that Sean was going to show up and make a comeback.
Oh well. He'll be the next bachelor (for sure!)

Anyways.
Back to the enchiladas!

If you like buffalo sauce, enchiladas, or cheese... these are for you.

Make them for your guy. I'm sure you'll knock his socks off!


Buffalo Chicken Enchiladas 

Recipe credit to The Novice Chef

Ingredients:
  • 1 lb boneless, skinless chicken breasts, cooked and shredded - {check out my tutorial here!}
  • 14 oz can red enchilada sauce
  • 1/3 cup buffalo sauce
  • 5 chopped green onions, divided
  • 1 1/2 cups shredded mozzarella cheese
  • 4 large whole wheat tortillas
  • 1/3 cup crumbled gorgonzola cheese
  • 1/4 cup fresh cilantro, coarsely chopped - I opted out for the cilantro this time because Laura absolutely despises it.

Directions:
  1. Preheat oven to 350 degrees. Spray an 8x8 glass dish with non-stick spray.
  2. In a medium bowl, mix together enchilada sauce and slowly mix in buffalo wing sauce...stopping to taste and adjust as you go. I used a little over 1/3rd a cup wing sauce, but we like it spicy! You as little, or as much as you like. Set aside.
  3. In a large bowl, toss together shredded chicken, half of the green onions, and 1/2 cup mozzarella cheese. Slowly pour in 1/2 cup of the enchilada sauce mixture and stir until combined.
  4. Pour 1/2 cup enchilada sauce into the prepared glass baking dish and spread mixture to the edges. Working with one tortilla at at time, fill with 1/4 of the chicken mixture. Roll the tortilla and place it seam-side down in the dish. Once all tortillas are filled, pour the remaining enchilada/buffalo sauce on top of tortillas and add the remaining mozzarella cheese.
  5. Bake for 20 minutes, or until the cheese is melted and the sauce its bubbling. Immediately after taking enchiladas out of the oven, top with gorgonzola cheese, cilantro, and the remaining onions. Serve immediately!
  6. Store any remaining sauce in the fridge for 1-2 weeks, and use if reheating leftover enchiladas.


According to The Novice Chef, you can easily double or triple this recipe.
Just make sure that you adjust the baking dish to fit!

I hope you enjoy this fun recipe.
I can see lots more times making it in future {football} events!

xo, Jen

Thursday, May 24, 2012

{recipe} chic greek salad


I've been learning a lot about cooking lately.

It is okay to use canned tomatoes when you are too lazy to go buy more fresh ones, (because your fresh ones went bad in a few days before you could make this salad... grr.)

It is okay to wing it and veer completely away from a recipe.

It is okay to use sweet onions in place of red onions in your greek salad, (because the red onions at Publix cost twice as much and looked completely yucky.)

It is okay that it takes me a million years to chop up veggies and herbs when it takes chefs on Food Network five minutes.

It is okay to substitute basil for parsley in this salad. In fact, I think I prefer it.

I could really go on and on.


This is not a traditional salad.

In fact, lettuce is not even an ingredient! It is made up of a bunch of different chopped up veggies mixed in with chickpeas, herbs, and artichoke hearts. It is hearty but still healthy.

You can eat this straight out of the fridge in a bowl by itself, throw it in a wrap with lunch meat, or eat it over lettuce. We chose to do the latter last night.

Oh, the difference natural light vs. nighttime light makes.

I can't wait to add it to my wrap for lunch today!

Chic Greek Salad:
Adapted from Rachael Ray's recipe 

Dressing Ingredients:
  • 1 small shallot, minced
  • 3 tablespoons red wine vinegar
  • 1 teaspoon dried oregano
  • 1/3 cup olive oil
Directions:
  1. Combine shallot, vinegar, and oregano in a bowl. Stir to combine and let stand 5 minutes.
  2. Slowly whisk in olive oil until dressing thickens.
  3. Put in fridge to cool.

Salad Ingredients:
  • 1/2 cucumber, seeds removed, chopped
  • 1 can diced tomatoes, drained -  (You can use two vine-ripe tomatoes, chopped - remember, mine went bad before I could make this salad! The canned tomatoes were fine as a substitute.)
  • 1 medium sweet onion, chopped -  (You can use red onion instead if you want)
  • 4 large sweet baby peppers, chopped - (Or use one large bell pepper)
  • 1 can quartered artichoke hearts, drained
  • 1 can chickpeas, drained and rinsed
  • 1/2 cup basil, coarsely chopped - (Or parsley)
  • salt & pepper, to taste
  • 1/2 lemon, juiced
  • 1 container feta cheese
Directions:
  1. Combine all ingredients but lemon and feta in a large mixing bowl and stir to combine.
  2. Squeeze lemon juice onto salad and stir to coat salad.
  3. Fold in feta cheese.
  4. Pour dressing onto salad and stir to combine again.
  5. ENJOY!


PS. I'm still looking to exchange more blog buttons
Email me if you are interested.
cookingloveandlife@gmail.com

xo, Jen

Friday, May 11, 2012

{recipe} quinoa "risotto" with mushrooms & spinach

So. I have been on a gym kick lately. 

I really don't enjoy the actual act of working out, but I sure do love how my body feels after I do it. There is nothing quite like the post-work out endorphins release to make you feel like a hundred bucks. When I got home from the gym last night, I knew that I wanted something fresh and healthy. I have already talked about all of the health benefits quinoa has and how much I love it in another blog post. This meal did not disappoint either. 


Quinoa "Risotto" with Mushrooms & Spinach
Recipe adapted from Wednesday Food Blogging

Ingredients:
  • 2 tablespoons olive oil
  • 1/2 cup diced sweet onion
  • 1 garlic clove, minced
  • 2 cups mushrooms, sliced
  • 1/2 cup white wine
  • 1 1/2 cup quinoa, rinsed
  • 1 1/2 cups chicken stock
  • 1/2 lb fresh spinach, chopped
  • Parmesan cheese, to taste.
**Notes: The original recipe called for shallots but I didn't have any, so I substituted the onion and garlic for it. Also, you can use mushroom or vegetable stock and omit the Parmesan cheese to make this meal vegan.

Directions:
  1. Heat the olive oil in a large saute pan. Saute onions and mushrooms in olive oil over high heat, until onions are clear and soft. Add the garlic and stir for 30 seconds.
  2. Stir in the white wine, and when the wine is absorbed, add the quinoa and the mushroom stock. Stir to combine and lower the heat as low as possible. Cover the pan and let simmer for 20-25 minutes until most of the liquid is absorbed.
  3. Add the fresh spinach to the top, cover, and heat for 2-3 minutes or until spinach is cooked. Stir to combine.
  4. Serve immediately, with Parmesan if desired.


This meal was perfect after a long workout at the gym.

What is your favorite post-gym dinner? 

xo, Jen

Thursday, April 26, 2012

{recipe} peanut-crusted tofu tacos with tangy slaw


Yum.
So yum.

I was really needing a refreshing, healthy recipe this week. It seems like ever since I turned 21 (which was over a year ago now), I have been drinking whatever caloric drink I feel like at dinner, and eating at all of those oh-so-good-but-so-bad-for-you college restaurants. The senior "ah I'm leaving so I must go to all of the hot spots in Tallahassee" 15 has hit me. I wanted a dinner that was light but still tasty.

The other day I crushed up some peanuts I had in my pantry to make peanut-crusted chicken skewers for a cocktails and appetizers party I had with my best friends. I kept thinking about how delicious those turned out and wanted to see what else I could put the peanuts on. I searched the web and found this delicious recipe. I added some hot sauce and avocado to my tacos and loved it! I hope you enjoy this recipe.


  • Peanut-Crusted Tofu Tacos with Tangy Slaw
  • Recipe by Cooking Light

  • Ingredients:
    (See notes below)

    • (14-ounce) package water-packed extra-firm tofu
    • 1/2 cup salted, dry-roasted peanuts **
    • 1/2 cup panko (Japanese breadcrumbs) **
    • 1/2 cup light coconut milk
    • large egg, lightly beaten
    • 3/4 cup all-purpose flour
    • 3 tablespoons canola oil, divided
    • 2 cups thinly sliced cabbage **
    • 1/3 cup sliced green onions
    • 2 tablespoons fresh lime juice
    • 1/2 teaspoon kosher salt
    • jalapeño pepper, seeded and thinly sliced **
    • (6-inch) corn tortillas
    • Lime wedges (optional)

  • Notes: I used a bag of coleslaw. I picked out a jalapeno at the grocery store but it never made it home with me so I was not able to include it. The slaw was still good without it! I found that I had to double the ingredients for the breading. It may seem like a lot when you are making it but it goes quickly! Have extra on hand nearby just in case.

  • Directions:
      1. Cut tofu lengthwise into 4 (1/2-inch-thick) slices. Place tofu slices on several layers of heavy-duty paper towels. Cover tofu with additional paper towels; let stand 5 minutes. Cut each tofu slice, lengthwise, into 1/2-inch-thick strips; cut strips in half crosswise.
      2. Place peanuts in a food processor; process until ground. Combine peanuts and panko in a shallow dish, stirring well. Combine milk and egg in a shallow dish, stirring well. Place flour in a shallow dish.
      3. Heat a large skillet over medium-high heat. Add 1 tablespoon oil to pan; swirl to coat. Dredge half of tofu in flour; dip in egg mixture. Dredge in peanut mixture. Add coated tofu to pan, and sauté 4 minutes or until golden and crisp, turning to brown on all sides. Remove tofu from pan, and drain on paper towels. Repeat procedure with 1 tablespoon canola oil, tofu, flour, egg mixture, and peanut mixture.
      4. Combine cabbage and the next 4 ingredients (through jalapeño). Drizzle the cabbage mixture with remaining 1 tablespoon oil; toss to coat. Heat tortillas according to package directions. Place 2 tortillas on each of 4 plates; top each tortilla with 1/4 cup slaw. Divide tofu evenly among tacos. Serve with lime wedges, if desired.

    PS. Don't forget to enter my GIVEAWAY! :)

    xo, Jen

Monday, October 17, 2011

{recipe} warm quinoa salad with roasted butternut squash

Hi!

I'm guest posting today at Melissa's blog - A Flower Child in the City.


It looks kind of scary.

It tastes delicious.


Leave Melissa some love and tell her you found her blog through mine. :)

xo, Jen

Thursday, September 29, 2011

{recipe} skinny chicken taco chili

What is a girl to do when the current season is officially fall? Make chili of course!

I'm a chili-a-holic. Spicy chili, turkey chili, Mexican chili, sweet chili, etc., etc. It's one of my favorite comfort foods.


Never mind the fact that it is still 93 degrees outside by day and 80 degrees by night. Let's get it together Florida! I'm ready to whip out my boots and leggings.

I'm not going to lie, I was sweating profusely while eating this chili... while sitting under a fan, nonetheless. It was so completely worth it. While I may have been a wee bit overheated while eating this dish, I didn't have to worry about my kitchen getting overly hot while cooking it. I whipped out our brand new handy dandy crockpot! I'm not sure how I have survived three years of college without one of these. I literally threw everything into the pot at around 11 AM, then ran errands, did homework, and studied for class. I didn't even have to check up on it until 30 minutes before I wanted to dig in. It was perfection! This chili is cheap, easy, has minimal cleanup, and is perfect for roommates with different schedules. Just throw it in before you go to work or class and keep it on the "keep warm" setting so stragglers with late meetings can have a hot meal as soon as they get home.


Did I mention that this chili is pretty healthy too?

I'm not one to count calories or calculate grams of fiber but I found this recipe on a blog that does, Gina's Skinny Recipes. If you haven't ever heard of her blog, you should definitely check it out. She has a ton of great lightened up recipes to share.

So want to hear the goods?

This chili only has 203.7 calories, 1.4 fat grams, and 33.3 carbohydrate grams per serving. On top of that there are 10 grams of fiber and 16.9 grams of protein per serving! Healthy comfort food is the best kind of food.

Easy, easy, easy.

Skinny Crock Pot Chicken Taco Chili
Recipe credit to Gina's Skinny Recipes
Ingredients: 
  • 1 onion, chopped
  • 1 16-oz can black beans
  • 1 16-oz can kidney beans
  • 1 8-oz can tomato sauce (I used no sodium added tomato sauce)
  • 10 oz package frozen corn kernels
  • 2 14.5-oz cans diced tomatoes w/chilies
  • 1 packet taco seasoning
  • 1 tbsp cumin
  • 1 tbsp chili powder
  • 24 oz (3-4) boneless skinless chicken breasts
  • chili peppers, chopped (optional)
  • Nonfat sour cream, reduced fat shredded cheese, and 1/4 cup chopped fresh cilantro for garnish.
Directions:
  1. Combine beans, onion, chili peppers, corn, tomato sauce, cumin, chili powder and taco seasoning in a slow cooker. 
  2. Place chicken on top and cover. 
  3. Cook on low for 10 hours or on high for 6 hours. (I ended up cooking the chili on low for 5 hours and high for two hours and the chicken was completely cooked through!)
  4. Half hour before serving, remove chicken and shred. (Click here for a chicken shredding tutorial! Your chicken from this recipe will literally be falling apart from simmering in the broth for so long.)
  5. Return chicken to slow cooker and stir in. Top with fresh cilantro. Also try it with low fat cheese and sour cream.
I think you could make this chili without a crock pot too. I would just make sure to cook the chicken and shred it prior to putting it into the chili to prevent any sort of contamination. You could probably just simmer the chili for about an hour in a big pot and then stir in the shredded chicken.

Also, this recipe makes quite a bit so my roommates and I decided to freeze half of the chili in a tupperware container. It freezes well. Just stick it in the refrigerator in the morning before you head off to class or work. It should be defrosted by the time you get home for dinner.


Here's to eating chili until the weather finally decides to cool down!

I'm a stubborn one after all.

xo, Jen

Sunday, September 18, 2011

{life} weekend recap + confetti pasta salad

Oh my. This weekend was fabulous.

First came the Corey Smith and Tyler Reeve concert.

Roommates. <3
Old roomies, kinda.
COREY.
This video is horrible quality, but you can see how close to the stage I was. :)


Then it was time for some FSU FOOTBALL!

I ran into my great grand-big & Jacki at the Unconquered statue!!
Tailgating fun!
84,000 strong.
Student section craziness:

The game was ABSOLUTELY RIDICULOUS. I will definitely remember attending that game for the rest of my life. It was the loudest I have ever heard the stadium.. even louder than the FSU v. UF game last year.

“It was just loud, I couldn’t hear anything, especially down there when we were in their student section,” Jones said. “I called some plays six or seven times, and I still don’t think the guys heard me.” 
ESPN article.

Mission accomplished student section. :)

We may have lost but it was a hard fight. I couldn't be any prouder of my team.

Oh and want a really easy pasta salad recipe? I made it for the tailgate an hour before I left for campus.

Confetti Pasta Salad
Adapted from MyRecipes.com
{photo credit}
Ingredients:
  • 8 oz medium pasta shells; cooked according to the box instructions.
  • 1 pint grape tomatoes, sliced in half.
  • 2 cups coarsely chopped spinach
  • 1 yellow bell pepper
  • 4 tablespoons sliced green onion
  • 8 oz. package crumbled feta cheese
  • 1/2 cup vinaigrette of choice - I used a Greek vinaigrette I had in my fridge already.
Directions:
  1. Cook pasta, drain and cool.
  2. Toss pasta with remaining ingredients. Leave out feta until just before serving.
  3. Serve immediately or cover and refrigerate for up to 8 hours before serving.
Enjoy!